affordable art: how to thoughtfully fill your walls

Affordable Art Series
We've all fallen victim to buying a set of something in a bid to make a space feel 'complete' quicker. This is an easy trap to fall into, especially if you’re planning on creating a gallery wall.
We wanted to create an Affordable Art series, to help you express yourself through your walls. The pieces of art that will be featured in this series will be under £150 and we’ll focus on independent artists and galleries. And if in doubt when buying art: take your time, never aim for 'complete' and only buy it if you truly love it.
As this is the first article in this series, we wanted to focus on the basics - how to set up a gallery wall - as opposed to specific artists. This is an opportunity to review the art you have and build around it.
Please note: this article includes affiliate links.
choosing your Frames & mounts
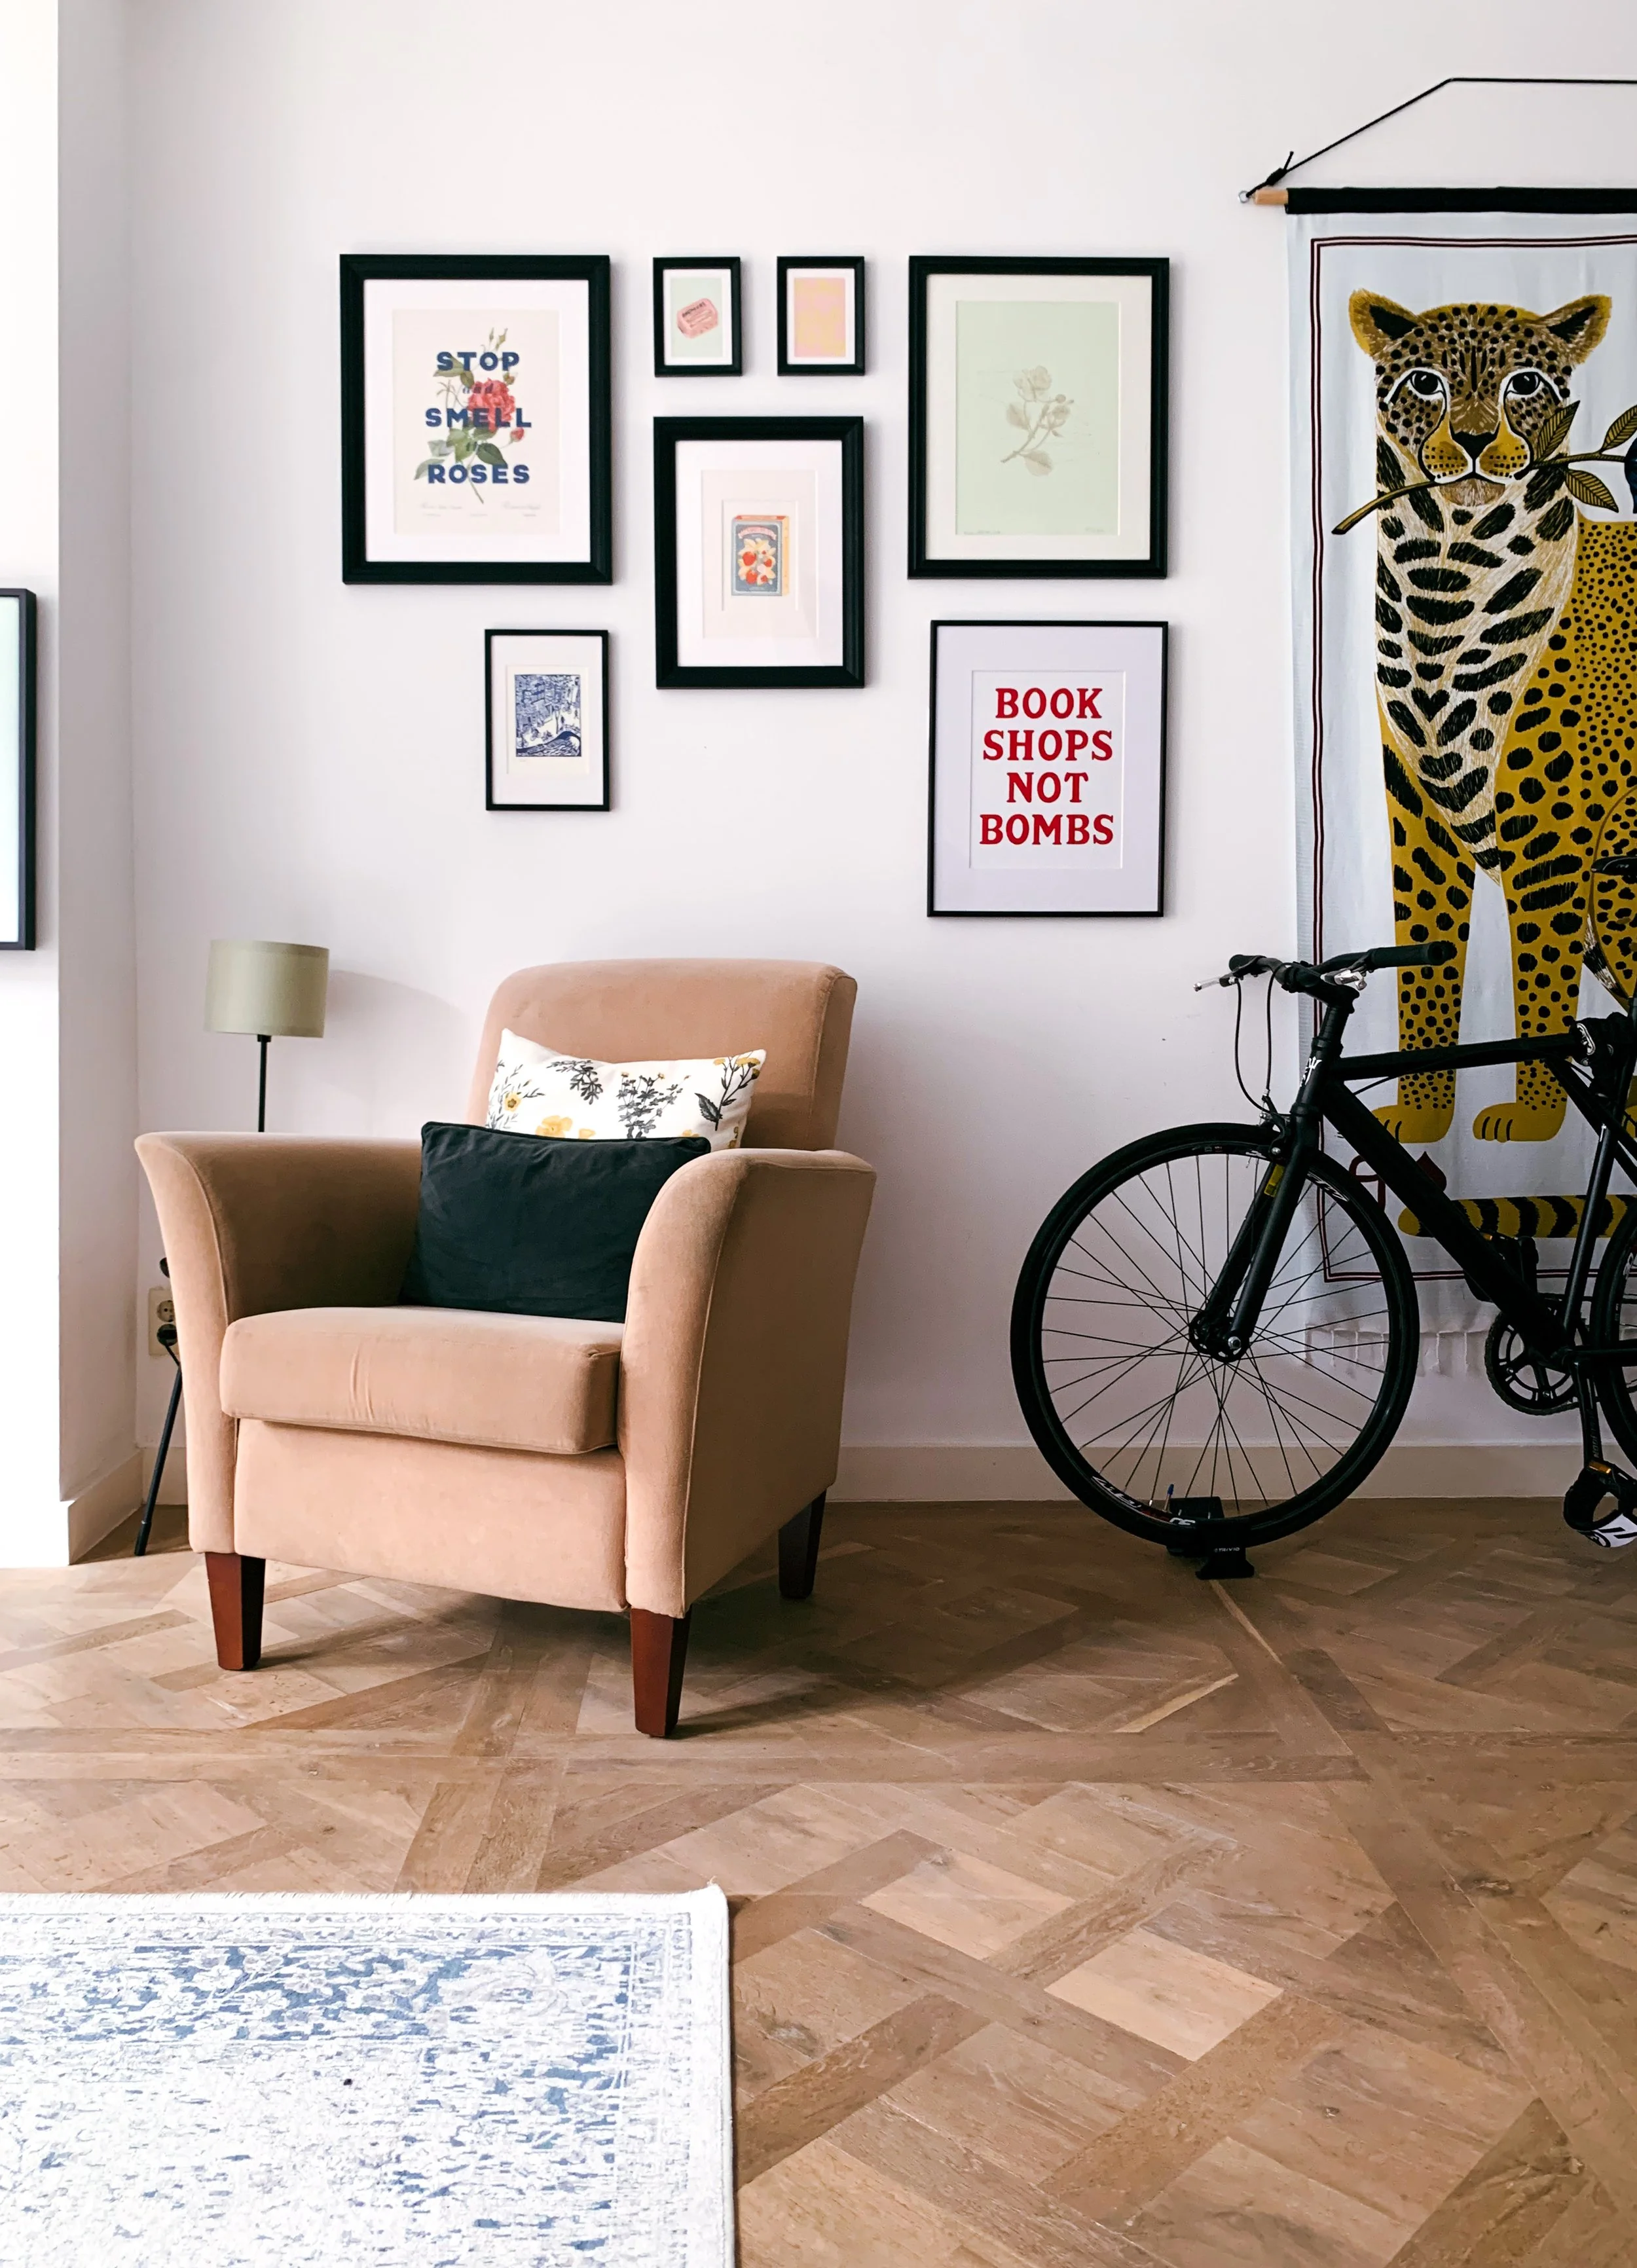
Think of what you put your art in as your art’s foundation. Set it up for success. This doesn’t necessarily mean spending a load of money on your frames, it just means don’t let your frame be an afterthought, think about how it can elevate and accentuate your piece. What’s the best thickness of frame to balance your piece? What colour frame, if any, would make the colours of your art stand out? Should you include a mount? Should this mount be plain, textured or patterned to add depth to your piece?
I’ve opted to have all black frames. This is less as a stylistic choice and more out of functionality. As a renter it means I’m free to switch art between rooms and contexts without worrying if the frames ‘go’. I tend to prefer thinner frames for smaller pieces and thicker frames for bigger pieces to create a balanced proportion.
I always err on the side of having a mount, I feel like a mount instantly adds a level of importance to whatever it is you’ve decided to frame whether it’s an original, print or a napkin. When choosing the colour of the mount, I usually opt for a neutral, white or off white, depending on the colours within the art. For example, the warm-toned pink of my ‘The Sun Shines Here Every Day’ print by Anthony Burrill works best with a warmer, cream mount. I usually buy a sheet of card from a local arts and crafts shop and then cut it to size myself. By cutting my own mount it means that I’m less at the mercy of prescribed frames and mounts.
The amount you decide to spend on your frames is totally up to you, in an ideal world we’d all use our local picture-framers, but you don’t have to spend a lot to get the finish you want. I swear by frames from The Range, they are so sturdy, come in a number of finishes and are such good value. The majority of my frames are from the Ashford range. IKEA’s frames are good, but I find the quality decreases in line with the size of the frame, so if you’re going to buy from IKEA do so for small-medium sized frames.
One thing I’ve done for special pieces of art is buying a frame from The Range and then taking it to a local framers to get it mounted. That way I get to choose a custom colour and size of mount, have it mounted professionally (so it’ll stay intact for longer) while paying significantly less than if I’d had the frame made too.


planning your gallery wall
The first step to making a gallery wall is getting all of the pictures you already have, or plan on buying, together. You don’t have to have a ‘complete’ gallery wall in order to plan one. And it’s not like there’s an ideal number or science to creating a gallery wall. The aim is to create the foundation, that way you can continue to build on it afterwards - if you’d like to. Once you’ve got all of your pieces together and in their frames, start laying them out on the floor. Play with the configuration. See what pieces look best together, and what shapes of frame and style of art best work together.
Once you’re broadly happy with the layout of your pieces take a picture - this is going to be your reference when you start putting them on the wall. Now, if you haven’t already, you need to figure out where you’d like to put our gallery wall. If you’re worried about not having enough space, measure the full height and width of your layout to check you’ve got enough room to put it where you’d like to.
Before you start putting your art on the wall, choose the ‘edge’ of your gallery wall and figure out what you want to align it to. The edge will be the top right or left corner of your layout, depending on the space and shape you’re creating. Here are a few ideas if you’re struggling to figure out what to align it to. If you’re putting it above your bed you could align it to the edge of your bedside table. If you’re putting it above your sofa you could align it to the edge of the sofa, or aim to fit the entire layout within the space behind your sofa. Or, if you’re putting it along your staircase you could align it with the final corner of your skirting board.
The main consideration here is: have you ‘completed’ your gallery wall or do you plan on adding to your gallery wall in the future? If it’s the former you can plan whatever layout you like as you’re not planning on adding more pictures - so it’s just about creating a layout that best balances what you already have. If, however, it’s the latter and you do plan on adding to your gallery wall, I’d recommend creating an asymmetrical layout. This way you’ll create clear spaces to put your new pieces in, and you have room to grow your gallery wall. Remember: there is no ‘right way’ to build a gallery wall, the aim is to place your pieces of art together in a way that you love. You can do this symmetrically or asymmetrically based on your personal preference.
Take my living room as an example, I’ve chosen to align my ‘edge’ of the gallery wall with the side table, and then I’ve built it out from left to right, to continually expand into the white space of the wall. And despite having a few evolutions, at no stage has the gallery wall felt ‘incomplete’. So while I’ve always wanted to expand it, I’ve never felt pressure to do so, instead letting it happen more organically.

putting your gallery wall, on the wall
Now you know your layout and where you’re going to put your gallery wall it’s time to get it onto the wall. Broadly you’ve got two choices here, if you want something permanent opt for hooks, nails and string or if you want something a little less permanent, opt for an adhesive strip, like Command Strips. As a renter, I’ve always used Command Strips, as they enable you to put your art on the wall without creating any holes. That being said, even when we buy a house I think we’ll continue to use command strips as it enables you to move your art as and when you like, or try again if you make a mistake or change your mind. I also find using Command Strips easier to use as you don’t have to factor in the height difference that comes with picture frames that you need to attach to the wall with a nail and string.
As you start to build out your gallery wall you’ll want to define the spacing between your pictures. The layout you created on the floor was your rough guide, now we’re putting it on the wall, we want to refine the placement. You might not be a stickler for spacing like me, and if that's the case just figure out the spacing by eye. But if you do want to try and create equal spacing between your pictures and don’t have the patience to measure the spacing with a ruler, I have a little trick. Figure out how much space you want between the pictures, then find an object in your house that is this size. It could be the width of a spine on one of your books, it could be a square coaster, it could even be a rolling pin.
My go to is usually a pad of post-its. Why? It’s light enough to hold - should you have to hold it above your head or for an extended period of time - and it’s got enough structural integrity that when you put pictures next to each other with your spacer in the middle, the post-its won’t fold in on themselves. This tool is not only going to help you space your pictures, it’s also going to check if they are straight. If you run a pad of post-its between two pictures stacked on top of each other you’ll easily be able to see if one of them is wonky.
looking for inspiration?
This article is the first in the Affordable Art series, future articles will focus on type of art and artist by category. You can find every piece of art featured in this series, and more, on Pinterest.